
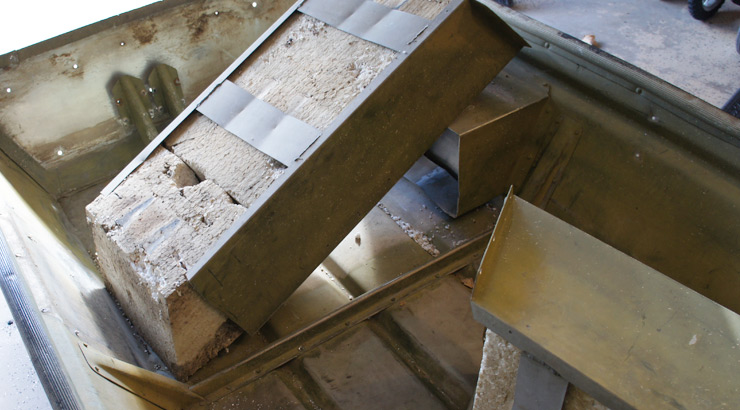
After I washed out the ‘ol boat in the front yard, which we discussed in Restoring the Old Jon Boat: Part 1 – Summary, I immediately started ripping out the seats so that I could have more of a shell. More of an open canvas.

There are all sorts of arguments online for the case against ripping out the foam in aluminum boats like this, primarily because it will help you float better… however – I’m not buying it. At least not at face value.

Think about it – if you placed a foam cooler inside the boat with you, would it help the boat float? Of course not. Will that foam minnow bucket from Wal-Mart full of water and bait aid in flotation? Nope! Just the opposite, it adds weight to that boat, doing more to weigh it down than lift it up.
Some people will actually use household spray can foam on the inside of their boat when they need to add more for whatever reason – DO NOT DO THIS!!!!! When we started to work on the Tuffy Restoration Project, I actually found this crap inside the boat – and it was completely waterlogged. (Apologies, I do not have pictures of this but I think you can see some of it in the Tuffy project videos I’ve linked.) This crappy foam added WEIGHT – it did not help with FLOTATION.
(A quick search let me know that the spray foam is not “closed cell”, which means it will take on water, and that the foam used in boats at the factory is “closed cell”, and impenetrable! Well, not impenetrable, but it doesn’t soak up water. We’ll keep this in mind as we continue to work on the Tuffy.)
Foam can displace water and prevent more from coming in the boat. Foam can add stability. Foam does not “help you float more good” just by being present.
So when is foam beneficial?
When you’re taking on water for one, because it means that space within the boat that could be filled with water is already filled with foam. This could prevent you from capsizing completely, and it could also make it somewhat easier to recover an upturned vessel… or keep your boat from sinking to the bottom of the lake.
Still, after considering this I decided I wanted the space, so the seats (filled with foam) had to go.

This led to the introduction of many holes in the hull… and I didn’t have any idea how to fix them…

One thing I learned right away was that there are several different kinds of rivets (sealed, solid and open for example) in several different sizes (quarter inch, half inch…) made from several different kinds of material (aluminum, steel).

If you are repairing an aluminum boat with rivets – make darn sure they are aluminum rivets. When you add water to a situation where you have steel and aluminum, you’ll get galvanic corrosion.
Make sure to take a few minutes and do a bit of research on this before you get too deep into your jon boat project. There’s a lot of information out there on this subject.
I also learned another very important lesson:
When you are working on a boat, do NOT drill holes any larger than you absolutely have to. Repairing holes sucks.

I had to purchase some washers to expand the reach of my rivets because several of the holes I attempted to plug were just too wide. These washers also needed to be aluminum to avoid corrosion, and I purchased them off of Amazon. They’re easy to find there, but I couldn’t find any in my local hardware stores.
At first, I purchased standard rivets, and as you can see here, the tube contains a small circular element that causes the rivet to expand when pulled into a rivet gun – but it does not create a water-tight connection.

Sealed rivets however, are completely closed off.


So sealed aluminum rivets, with aluminum washers, in combination with Marine Sealant Silicone was what I used to plug all of the holes that I had created. Quick note on the latter… don’t try to use old silicone!
Go ahead and load your rivet up with the silicone, pop it in the hole, apply pressure using the rivet gun and you’re good to test. If you don’t need to use a washer – don’t! I used several on the INSIDE and OUTSIDE of the hull as you can see in these images. If the rivet head was not wide enough to completely cover the hole and stay firmly in place, then I would place a washer on the opposite side of the hull for stability and added coverage. If you can avoid this though, you’ll have fewer points that could fail.

(You can see an example of this at about 2:45 in the “Jon Boat Modifications: Using Aluminum Rivets” on YouTube.
One other thing to keep in mind is that rivets come in different sizes, with different sized shanks. The shank is the tubular portion and it gets left behind after the mandrel is spent. Use the shortest shank that you can get away with (I believe most of mine were 1/4″ long, and 3/16″ in diameter), because the longer they are, the more chance you have of snagging one with your clothes or a shoe or a bag. Aluminum is not as strong as steel, and you could break them off if you catch one the right way.
So nothing to worry about, but do be careful.
Best of luck with your project. I’ll post another update on the jon boat soon – and in the meantime if this helped you in any way or if you have any questions, hit me up on social media or in the comments and let me know – I’m happy to help!
Tight Lines & Godspeed, Patriots.

Get Articles & Videos First
Catch More Fish Than Your Friends. Laugh At Their Tears.


Thank You For Your Support
Your support directly funds the creation of weekly articles and videos that promote the development of better anglers and better men. Our country (and our kids) need both. Please share this site, and consider a monthly, weekly, or one-time donation. You are helping us make a difference!


What do you think?