Category: Fishing Projects

Projects that anyone can do related to bait customizations (beyond “hacks” and tips), boats, electronics, etc.

  • How to Lubricate a Spinning Reel (Oil & Grease Step by Step Fishing Tutorial)

    How to Lubricate a Spinning Reel (Oil & Grease Step by Step Fishing Tutorial)

    WARNING: Skipping gear maintenance is the fastest way to ruin a fishing trip.

    (Don’t ask me why I know this…)

    Callout Section The Minimalist Fisherman Midwest Bass Fishing Blue Banner Background Migration

    Good evening brothers.

    You’ve likely encountered some version of this quote:

    “Take care of your equipment and your equipment will take care of you.”

    I’ve heard it for years, from parents & grandparents, although recently Jocko Willink has been credited with the version above. I didn’t realize this even though I do quite a bit of design work for his company, Echelon Front. But It doesn’t matter where the phrase originated – what matters, is that it’s correct.

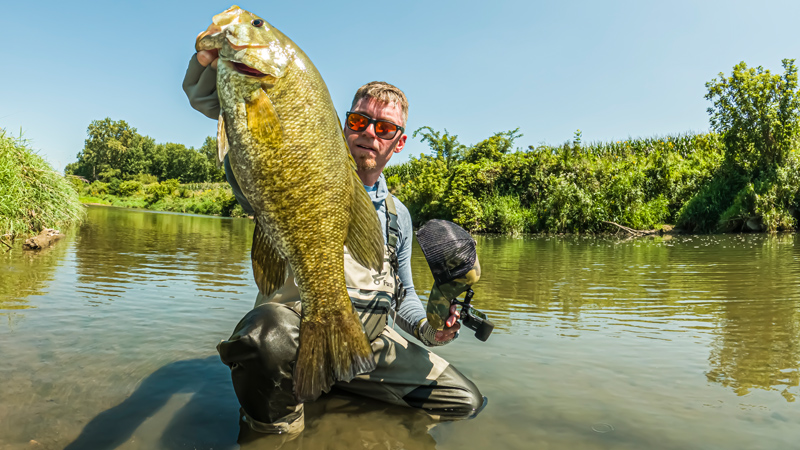
    Let’s talk about taking care of your spinning reels.

    How to Oil a Spinning Reel Tutorial Maintenance Lews Lew's
    A few simple tools, some quality fishing reel oil & grease, good lighting plus a clean workspace (with fake succulents?) and we’re ready to begin!

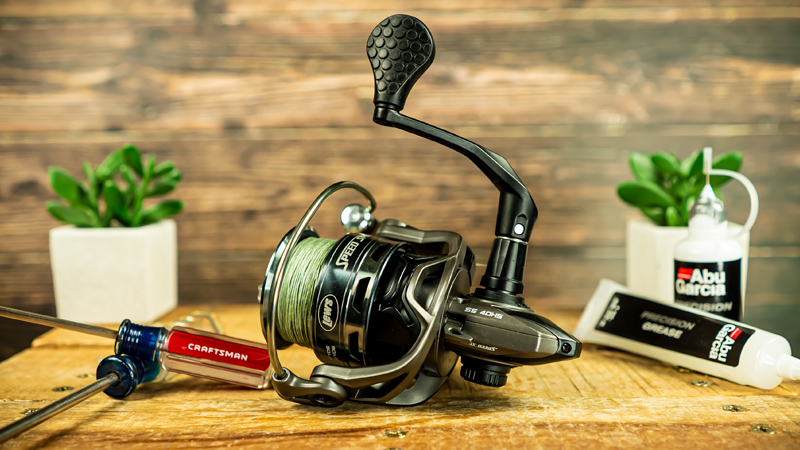
    How Often Should You Lubricate Your Fishing Reel?

    Great question. The answer is another question: how often do you use your spinning reel? Here in the Midwest I fish twice a week (three times if I’m lucky) from spring through fall. Roughly early April to Late October. 4 hours at a crack.

    Illinois Largemouth Bass Fishing Pit TRD Weightless Texas Tx Rig Kayak
    Early spring largemouth after the wind almost flipped me over

    Under normal circumstances, a general oil & grease (as outlined below) at the beginning and end of the season is just fine, and keeps my reels functioning properly. Smooth. Better performance makes for more enjoyable fishing trips, and allows the focus to be on the conditions and the fish – not problems.

    However, certain events trigger the need for a re-lube. Have you ever dropped your rod & reel into a creek? I love to get into the thick of it and fish in places where others fear to tread. However… I drop my stuff all the time

    Dropping my camera in the drink.
    Fishing awesome places all alone.

    I also used to allow my reel to hang under my arm or between my legs, in the water, while unhooking fish, not realizing that submerging a reel allows water carrying sediment, grit and grime to seep it’s way into the inner cavity, which can wreak havoc on the internals. Sometimes said havoc is wreaked quickly, sometimes it takes a while – but ultimately what you will end up with is a gritty, clunky feeling as you turn the handle… and your spinning reel will eventually seize up completely.

    Not cool.

    Always oil and grease your spinning reel after it has been submerged – or better yet, avoid submerging it.

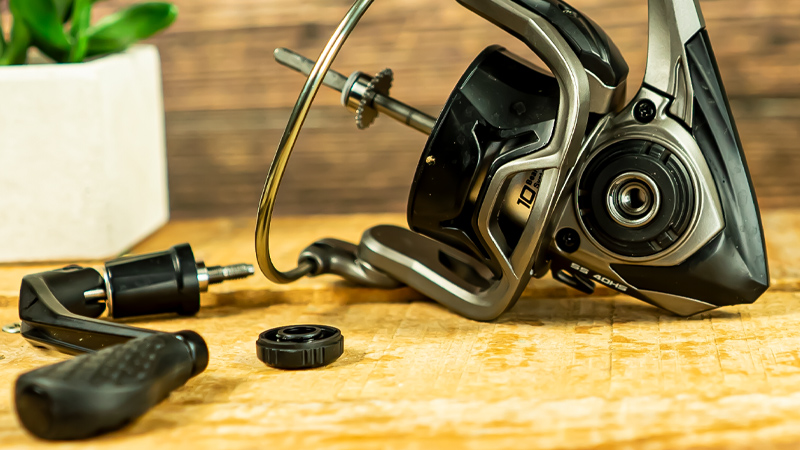
    If your reel has completely seized up, you will need to disassemble everything, clean everything, and apply new grease and oil. This article covers a good portion of that disassembly process.

    Spinning Reel Oil & Grease Process (Simple)

    We’re going in-depth on the following 6 steps:

    1. (Oil) Handle Knob Bearing
    2. (Oil) Spindle
    3. (Oil) Bail Arm
    4. (Oil) Line Roller
    5. (Oil) Handle Assembly (Interior Bearings)
    6. (Grease) Interior Gears & Guides

    1. Oil the Handle Knob Bearing

    How to Oil a Spinning Reel Tutorial Maintenance Lews Lew's
    1. (Oil) Handle Knob Bearing

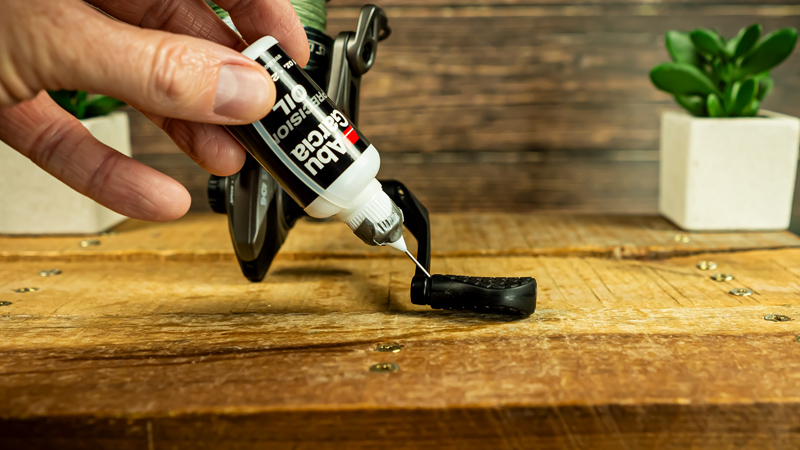
    Place a single drop (ok, maybe two) right at the edge of the handle knob. Some spinning reels have bearings here, others rely on (cheaper) plastic collars. No matter – it’s a moving part so dab it up before moving on.
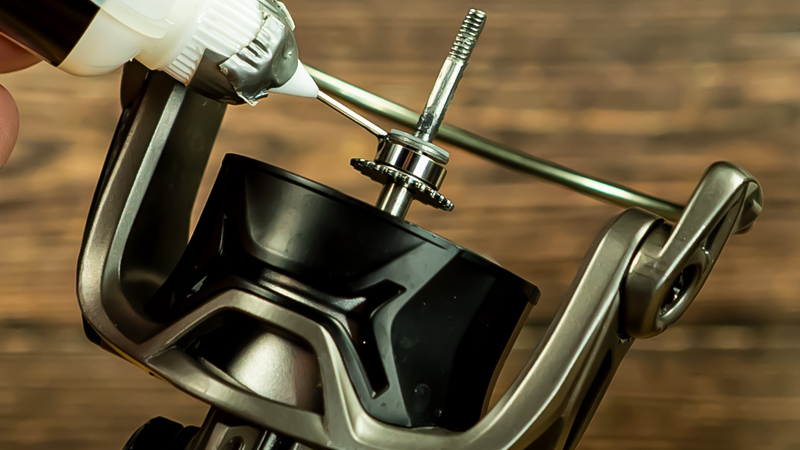
    2. Oil the Spindle

    How to Oil a Spinning Reel Tutorial Maintenance Lews Lew's
    2. (Oil) Spindle

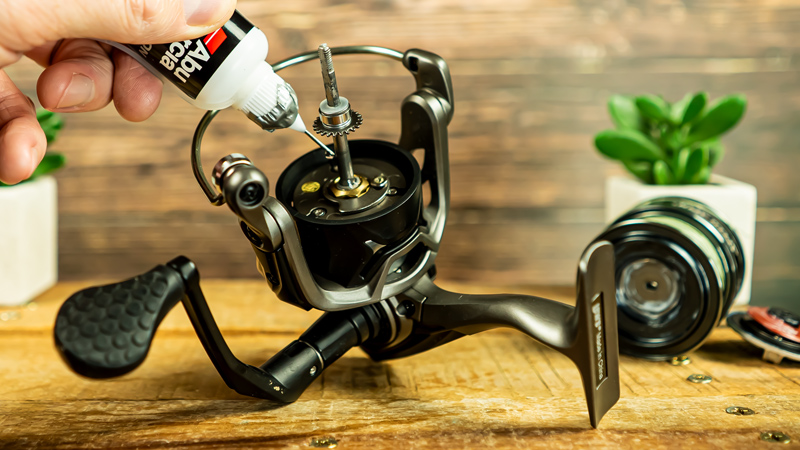
    Your spool rests on the spindle, usually on some combination of a star washer (or “external tooth” washer), a bearing or plastic collar, and a plastic washer. The drag cap (on top) holds the spool in place. Unscrewing the drag cap completely will release the spool, revealing the spindle, washers & bearings.

    Since the spindle moves up and down when you crank the handle, add 2 to 3 drops of oil underneath the star washer, then turn the handle to work it in. I also like to pull the plastic washer on the spindle up, and add a drop of oil between these parts – especially on the bearing that rests on the star washer.

    How to Oil a Spinning Reel Tutorial Maintenance Lews Lew's
    Lew’s Speed Spin spindle stack: star washer, bearing, metal and plastic washer

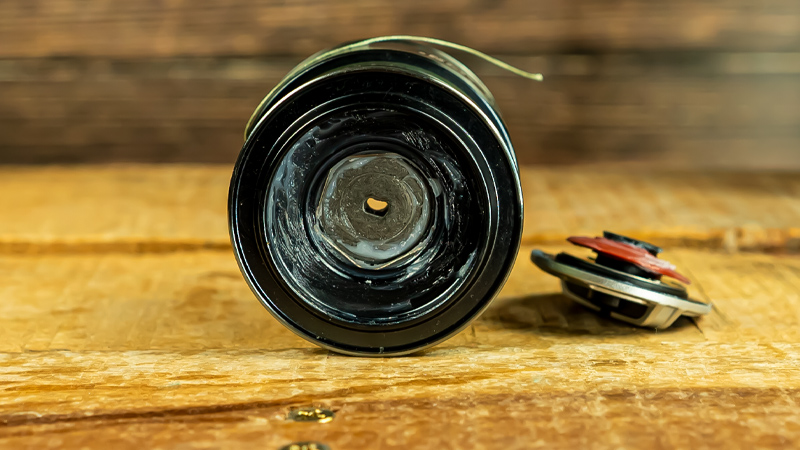
    Note that when you remove the drag cap, your drag washers may fall out. These are usually alternating metal and felt washers, or carbon, or composite… so just remember to be careful when you lift off the spool. On my Lew’s Speed Spin (SS 40HS) you can see they are actually pinned in place.

    How to Oil a Spinning Reel Tutorial Maintenance Lews Lew's
    Lew’s Speed Spin w/ drag washers pinned in place

    Drag washer grease is different than reel grease. It is also common to find spinning reel grease that is different than baitcaster grease. How many different kinds of grease do you need?

    That’s up to you.

    Had I found felt washers that were dry, I would have had no problem putting a bit of my general reel grease on them (a little lube is better than no lube, amirite?) – or even a few drops of oil. But drag washer specific grease would be best – and as you can see, this thing is (sloppily) packed already. I considered wiping some out, but since the reel performed well this season, I just left it be.
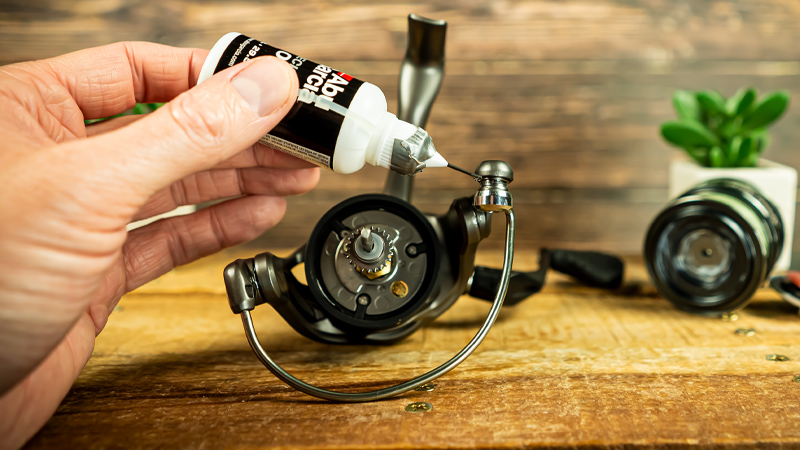
    3. Oil the Bail Arm

    How to Oil a Spinning Reel Tutorial Maintenance Lews Lew's
    3. (Oil) Bail Arm

    Place a drop of oil on either side of the bail arm. Your reel may actually have grease inside this area, by the bail spring – but there is no need to disassemble at this time. Work the bail back and forth to get the oil in between this connection on the bail assembly.

    4. Oil the Line Roller

    How to Oil a Spinning Reel Tutorial Maintenance Lews Lew's
    4. (Oil) Line Roller

    The line roller lives on the bail. This is what your line actually comes across on the retrieve. Low friction here is obviously extremely important so that you do not compromise your line. Place a good drop on either side and try to work it in with your finger.

    I have come across articles online where guys talk about adding grease to this area instead of oil. Some say they have had good results – I haven’t tried this. Some reels have bearings, others have plastic sleeves or collars – but whatever your model, there are most likely moving parts here.

    Check to make sure whatever it is moves freely, then hit it with that oil.

    5. Oil the Handle Assembly (Interior Bearings)

    How to Oil a Spinning Reel Tutorial Maintenance Lews Lew's
    5. (Oil) Handle Assembly (Interior Bearings)

    Unscrew the handle itself by rotating it backwards while holding the bail assembly in place. Some models may have a long screw on the opposite side that you need to remove to free the handle. As you can see in my case all I had on the opposite side was a cap.

    Either way, once the handle assembly is free, look for bearings within the body of the reel, and apply oil.

    Now would also be a good time to look for areas on the handle itself that you couldn’t access when it was attached. A little oil here and there is never a bad idea.

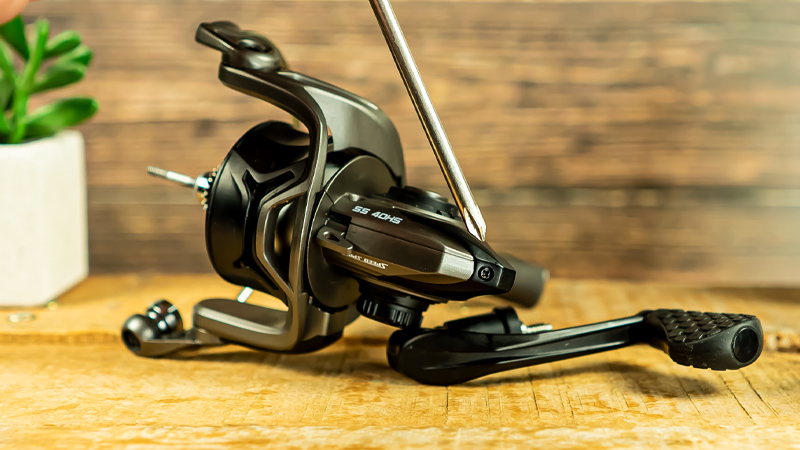
    6. Grease the Interior Gears & Guides (WARNING!)

    Our final step might be a bit more complicated, depending on your reel. We need to open the guts by removing the body side plate. Some companies make this simple… I assumed this company would make it simple… and I assumed wrong…

    How to Oil a Spinning Reel Tutorial Maintenance Lews Lew's
    Don’t panic bro – it’s not as scary as it looks.

    Still, we got ‘er done, and I’ll show you how, but before you proceed…

    Make sure to grab the schematic that goes with your reel so you have something to reference if a spring shoots across the room unexpectedly.

    (Don’t ask me why I know this…)

    How to Oil a Spinning Reel Tutorial Maintenance Lews Lew's Schematic
    The schematic for my Lew’s came in very handy when I was searching for hidden screws…
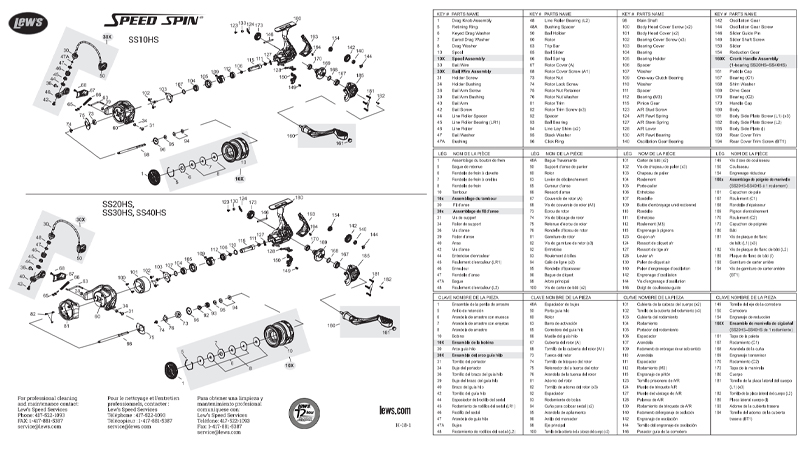
    [ View the Lew’s Speed Spin PDF ]

    Then make sure you have good lighting, no holes in your workbench, and make slow, careful, deliberate movements.

    You can do it. Let’s go.

    Remove the rear cover trim piece. This is usually held in place with a single screw.

    How to Oil a Spinning Reel Tutorial Maintenance Lews Lew's
    Rear cover trim screw

    Pay attention to the length of every screw you remove during this process. It’s common to have several the same color, the same diameter… but different lengths. This can be a nightmare.

    (Don’t ask me why I know this…)

    Keep every piece you remove in order on your workbench. A systematic line from the first piece you remove to the last. This makes the reassembly process… not… full of swear words…

    (Don’t ask me why I know this…)

    The trim piece should come free with light prying. If not, slow down and look for hidden screws or tabs. Notice how mine hid one of the side plate screws?

    How to Oil a Spinning Reel Tutorial Maintenance Lews Lew's
    … I am very very sneaky sir…

    This is why I had to remove it first. Once it was free, I went to work on the side plate screws… but much to my dismay, said side plate would not lift free.

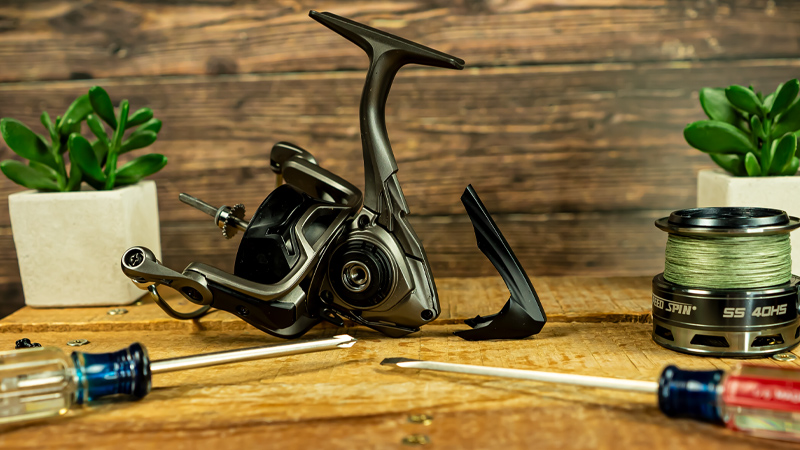
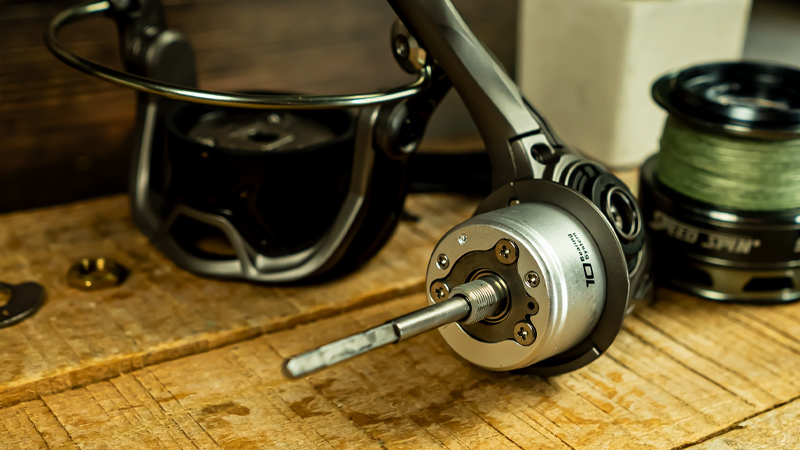
    I had to remove the bail assembly.

    How to Oil a Spinning Reel Tutorial Maintenance Lews Lew's
    A few pieces usually hold the bail assembly in place.

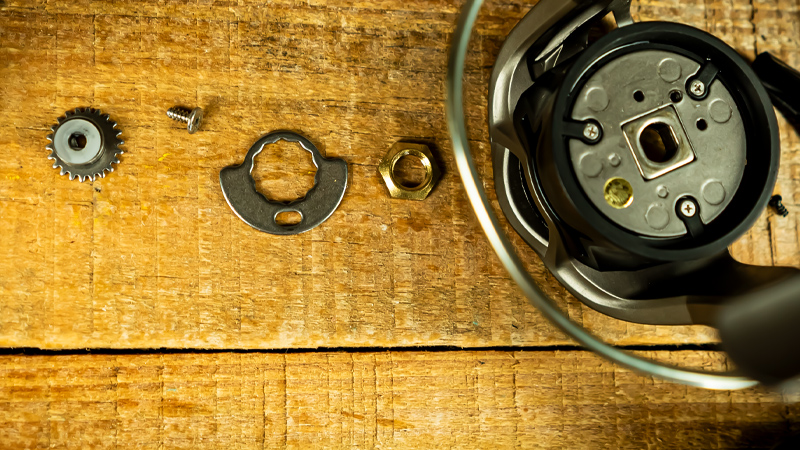
    First, remove the spindle stack (star washer, bearing, metal and plastic washer) followed by the screw that holds the rotor nut retainer stationary. This is what locks the rotor (gold) nut in place. Loosen the rotor nut by twisting it clockwise – usually – all of the reels I have disassembled have reverse threads on this nut.

    Never crank it super hard.

    (Don’t ask me why I know this…)

    This allowed me to remove the bail assembly, and see the body head cover, held in place with two small screws.

    How to Oil a Spinning Reel Tutorial Maintenance Lews Lew's
    The body head cover keeps everything nice & neat & protected.

    My last hidden screw was right there – below the body head cover. Once removed, the side plate was finally free.

    How to Oil a Spinning Reel Tutorial Maintenance Lews Lew's
    … I fear you are underestimating the sneakiness sir…

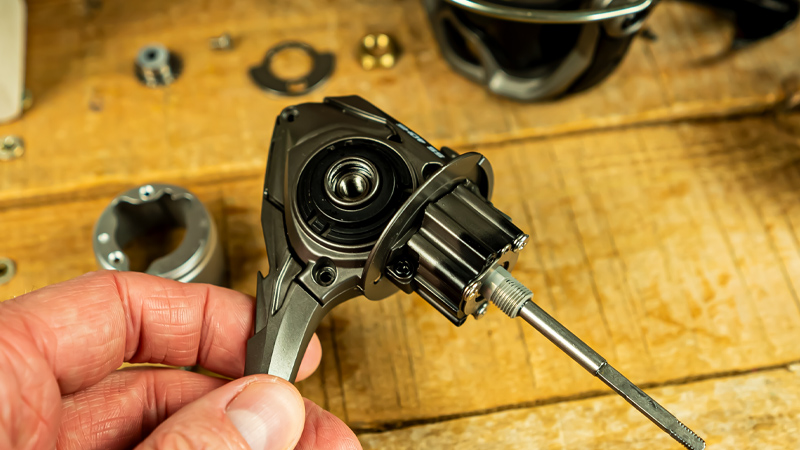
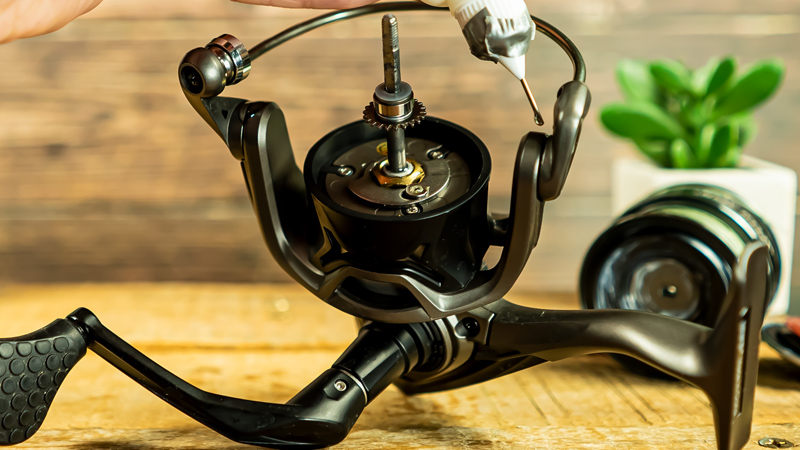
    Then, I had access to the guts.

    How to Oil a Spinning Reel Tutorial Maintenance Lews Lew's
    It’s beautiful.

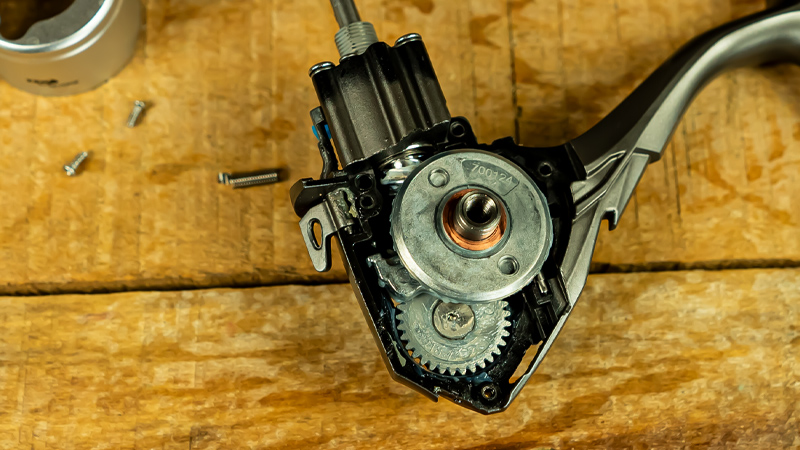
    Notice my anti-reverse lever spring popped free? Yeah… but I caught it! That clean work area is key!

    It’s time to apply the grease.

    Hit the slider guide pin, and the oscillation and reduction gears after removing the primary drive gear. Don’t forget to apply grease on the lower portion of the pinion gear (which is dead center, surrounding the lower portion of the pinion itself).

    How to Oil a Spinning Reel Tutorial Maintenance Lews Lew's
    I made ’em extra sloppy!

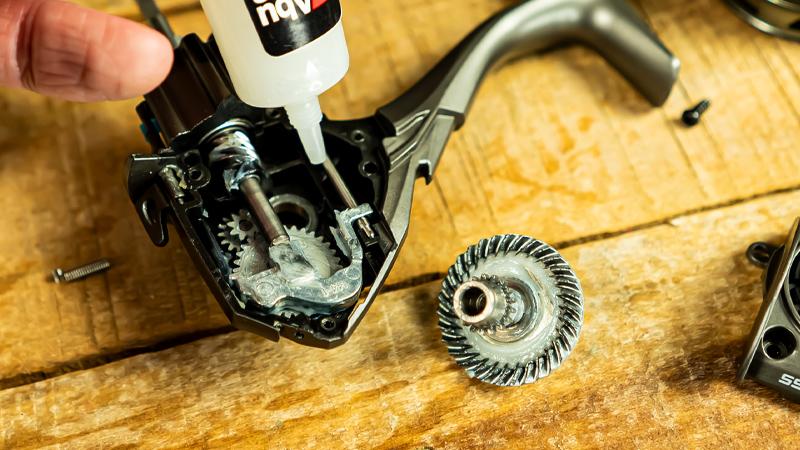
    You don’t have to COAT the gears. You don’t want them to be swimming in grease, but do apply a nice dollop or two and work it in.

    How to Oil a Spinning Reel Tutorial Maintenance Lews Lew's
    I may have used a bit too much… but I think we’re ok…

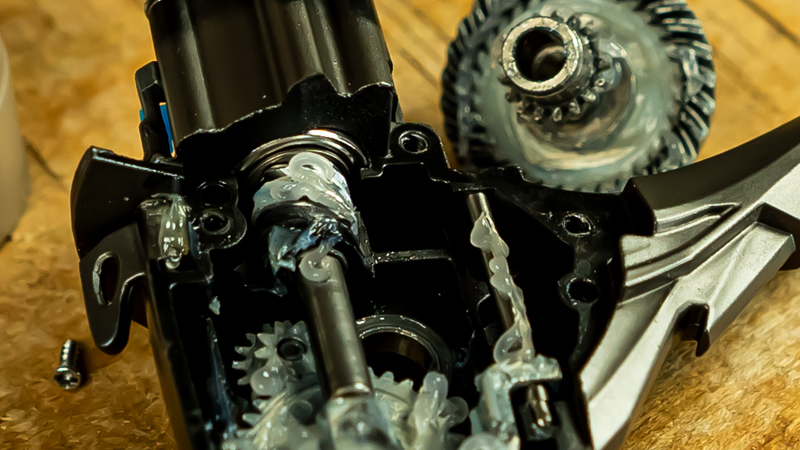
    Carefully put everything back together in reverse order, make sure the bail opens and the gears sound smooth. Spend a minute working the bail and spinning the handle to distribute the grease and oil.

    That’s it!

    You have successfully complete Spinning Reel Oil & Grease Maintenance 101 (send me just $95 to receive your diploma). Now the only thing left to do it get ready to catch some bruisers!

    aj hauser minimalist fisherman smallmouth river bass strike king rage craw
    Take care of your equipment, and your equipment will take care of you.

    Tight Lines & Godspeed, Patriots.

    Callout Section The Minimalist Fisherman Midwest Bass Fishing Blue Banner Background Migration
    The Minimalist Fisherman Father Son Bonding Better Anglers Better Men

    Thank You For Your Support

    Your support directly funds the creation of weekly articles and videos that promote the development of better anglers and better men. Our country (and our kids) need both. Please share this site, and consider a monthly, weekly, or one-time donation. You are helping us make a difference!

    TMF Small White Logo
  • FIXED! Water Damaged GoPro w/ Media Mod | Repair All Models | How To Fix (Simple)

    FIXED! Water Damaged GoPro w/ Media Mod | Repair All Models | How To Fix (Simple)

    Fix a Water Damaged GoPro Hero and Media Mod using this simple trick. NOTE: THIS IS A LAST EFFORT TECHNIQUE TO BE USED AFTER ALL OTHER METHODS HAVE FAILED! While the temperature should not harm your GoPro Hero or your GoPro Media Mod, only attempt these steps at your own risk.

    When I fell out of my kayak into the creek, my GoPro and Media Mod filled up with water. The ports, the battery compartment, the microphone… all of it. This caused my GoPro to stop working completely – it was damaged, ruined, and as you can see in the video the microphone shorted out before it stopped recording altogether.

    Fortunately, when I got home I was able to fire up a simple tool that sucked all of the excess moisture out of the water-logged components, completely repairing my GoPro & Media Mod.

    Sweet!

    Click Below to Play Video
    The Minimalist Fisherman - Over 2,000 Subscribers Banner
    Click the banner to jump to The Minimalist Fisherman on YouTube.
    Click Above to Play Video

    Let me know what you think – and if you have any luck, share your fish pics on Instagram and either tag me or shoot me a message!

    Tight lines!

    Callout Section The Minimalist Fisherman Midwest Bass Fishing Blue Banner Background Migration
    The Minimalist Fisherman Father Son Bonding Better Anglers Better Men

    Thank You For Your Support

    Your support directly funds the creation of weekly articles and videos that promote the development of better anglers and better men. Our country (and our kids) need both. Please share this site, and consider a monthly, weekly, or one-time donation. You are helping us make a difference!

    TMF Small White Logo
  • Subscriber Feedback: How To Paint Ruined Dardevle Spoons

    Subscriber Feedback: How To Paint Ruined Dardevle Spoons

    Not that long ago we created a video that went over a method of spoon refinishing that was a way to both have fun, and save a few bucks.

    Repaint Refinish Old Pike Spoon Fishing
    The Minimalist Fisherman - Over 2,000 Subscribers Banner
    Click the banner to jump to The Minimalist Fisherman on YouTube.

    After the video posted, a subscriber contacted me to ask a few questions – but also to share his results. This was awesome for two reasons: first, I love the fact that these videos are helping other anglers… but… it’s also really fun to connect with them and talk shop. To hear what they think and what elements of a video are important to them – and why:

    Hi,
    Loved the painting spoon video I saw on YouTube. I’m excited to try this project, but quick question. What is the mesh again? You said your wife called it “tool?”

    – Terry

    Thanks Terry!
    So the material I picked up was something called “tulle” that they have at WalMart. Weird spelling. I found some here. I think this was the exact kind I bought:
    https://www.walmart.com/ip/BBCrafts-371001-Polyester-Tulle-Fabric-Bolt-54-Inch-by-40-Yards-White/122199129

    -AJ

    Hey again AJ,
    They came out pretty nice! I just kept staring at them last night. Lol. I may have messed up the epoxy. It was the gorilla glue kind and it was sitting in my closet for like 3 years so the resin hardened up and didn’t mix well. Now it’s still sticky about 10 hrs later. We’ll see if I have to get a fresh tube and redo it but it looks great so far. Really appreciate your video. You have opened up my eyes to a whole new world! Guys are charging $17 for fluke spoons. No thanks! I’ll do it myself and have a lot more fun! Thanks again! God bless you and your family!

    – Terry
    Subscriber Feedback Custom Fishing Spoons Terry Woo
    Subscriber Feedback Custom Fishing Spoons Terry Woo

    Terry, those are awesome man! Thank you so much for sending that picture to me – this just made my day.
    Where do you fish and what do you typically fish for? You’ll have to let me know who is selling fluke spoons for $17… maybe we need to go into business together…

    – AJ

    I fish saltwater in all parts of Long Island, NY. Love Fluke fishing. I want to epoxy everything now lol. Thanks again!

    – Terry

    It really did make my day.

    It is a lot of fun when other anglers contact me through the site, email or snail mail, on Instagram or even just in the comment section of YouTube. There has been no shortage of hate over the years – but with nice emails and comments like what Terry sent me… it’s easy to let the bad stuff roll right off my back.

    Hit me up – and tight lines!

    Callout Section The Minimalist Fisherman Midwest Bass Fishing Blue Banner Background Migration
    The Minimalist Fisherman Father Son Bonding Better Anglers Better Men

    Thank You For Your Support

    Your support directly funds the creation of weekly articles and videos that promote the development of better anglers and better men. Our country (and our kids) need both. Please share this site, and consider a monthly, weekly, or one-time donation. You are helping us make a difference!

    TMF Small White Logo

  • Build It Break It Fix It Fish It

    Build It Break It Fix It Fish It

    Fix your broken fishing rod with this super strong repair! This tutorial covers everything from supplies to technique and includes a segment where we take the repaired fishing rod out to test it on some feisty largemouth bass. Also, to show you how much I believe in it – I bought completely new components and built a brand new fishing rod just so I could break it for this video.

    That was painful… but the end result is fantastic.

    BUILD IT BREAK IT FIX IT FISH IT!

    Free Download Rod Repair Checklist
    Click Here to Download the FREE Rod Repair Checklist
    The Minimalist Fisherman - Over 2,000 Subscribers Banner
    Click the banner to jump to The Minimalist Fisherman on YouTube.

    If you are looking for the FREE Fishing Rod Repair Checklist you can click on this link!

    @aj.hauser

    Let’s get better.

    OH – here are some additional pictures of the finished rod repair and the process in general. As you can see it came out really nice! If you try this method make sure to contact me and show me your results!

    Broken Fishing Rod Before Our Rock Olid Repair
    Broken Fishing Rod Before Our Rock Solid Repair
    Splint for Fixing Our Broken Fishing Rod
    Splint for Fixing Our Broken Fishing Rod
    The Final Result: Completely Fixed Broken Fishing Rod
    The Final Result: Completely Fixed Broken Fishing Rod
    The Final Result: Fixed Broken Fishing Rod Tutorial
    The Final Result: Fixed Broken Fishing Rod Tutorial
    Beautiful Fix for a Broken Fishing Rod
    Beautiful Fix for a Broken Fishing Rod
  • Painting Ruined Spoons with Walmart Supplies

    Painting Ruined Spoons with Walmart Supplies

    Z-Man ElaZtech is awesome stuff… until it comes into contact with something else, like other plastics or even the finish on your favorite Dardevle spoon. Then it’s game over. But never fear – with the use of some inexpensive Walmart supplies and these step-by-step instructions, anyone can bring back – and even IMPROVE – their damaged spoons without any prior experience. Let’s get started!

    The Minimalist Fisherman - Over 2,000 Subscribers Banner
    Click the banner to jump to The Minimalist Fisherman on YouTube.

    Let me know if you have any suggestions for improving, or a pond or creek to fish, or just want to say hey in the comments or on social media. I’m always trying to improve and appreciate your input. Thanks much!

    @aj.hauser

    Let’s get better.

    OH – here are some additional pictures of the finished spoons. They came out really nice. If you try this method make sure to contact me and show me your results!

    Repainting Spoons for Pike with WalMart Supplies
    Repainting Spoons for Pike with WalMart Supplies
    Repainting Spoons for Pike with WalMart Supplies
    Repainting Spoons for Pike with WalMart Supplies
  • Restoring the Old Jon Boat: Part 3 – Using Sealed Pop Rivets

    Restoring the Old Jon Boat: Part 3 – Using Sealed Pop Rivets

    I lost Bill the night before I taped this video.

    He killed himself.

    Bill was my pet largemouth bass.

    Bill the Fish Killed Himself
    Goodbye, Sweet Prince…

    He jumped out of his aquarium and dried up on the floor. I am still completely confused at to why he did this. Fred the Miracle Fish did this as well… at a later date… maybe we’ll get into this a bit more later on – but…

    Back to the jon boat!

    Here is an update on using sealed pop rivets. Like we mentioned in the last article + video, these are aluminum which is very important! We used these – along with marine grade silicone – to plug up the holes left in the aluminum after I removed the seats that were in the boat – leaving just the shell of the hull.

    Jon Boat Upgrades: Using Sealed Pop Rivets
    The Minimalist Fisherman - Over 2,000 Subscribers Banner
    Click the banner to jump to The Minimalist Fisherman on YouTube.

    A few important points:

    If you are using marine grade silicone (or any silicone) to apply and repair the holes in your boat, make sure you only squirt out what you need. When I was completing this step, the silicone I had out was drying up and getting gummy and hard to work with.

    I actually had to remove one of the rivets because the silicone did not create a good, smooth seal.

    So definitely something to be mindful of.

    Aluminum Jon Boat Holes to Fill
    Aluminum Jon Boat Holes to Fill
    Aluminum Rivet, Silicone and Washer Combination on Jon Boat Hull
    Aluminum Rivet, Silicone and Washer Combination on Jon Boat Hull
    Inside View of the Rivets Used on the Jon Boat
    Inside View of the Rivets Used on the Jon Boat

    Also, like I mentioned in the previous video, make sure to use the smallest drill bit you can when you are removing old rivets.

    I made a lot of extra work for myself by creating holes larger than they needed to be – don’t repeat my mistake!

    The way that I fixed this issue was by stacking washers. You can see in some spots in the video a little washer on top of a big washer held together with the silicone and the rivet. Not the best situation, but they have held up.

    You can check out a more recent update on the boat here if you’d like.

    So all in all, this step was successful. We have a few more things to do to the interior and then we need to take it out on the water just to test everything and make sure all of the holes and rivets are water tight!

    Tight Lines & Godspeed, Patriots.

    Callout Section The Minimalist Fisherman Midwest Bass Fishing Blue Banner Background Migration
    The Minimalist Fisherman Father Son Bonding Better Anglers Better Men

    Thank You For Your Support

    Your support directly funds the creation of weekly articles and videos that promote the development of better anglers and better men. Our country (and our kids) need both. Please share this site, and consider a monthly, weekly, or one-time donation. You are helping us make a difference!

    TMF Small White Logo
  • How the Jon Boat is Holding Up

    How the Jon Boat is Holding Up

    Several years back we started The Jon Boat Project. It went well. Today, I’d like to give you an update on the original boat project and show you how everything is holding up, as well as a closer look at some of the modifications that were made.

    This was a great, relatively simple project that anyone can do. It’s also a great alternative to shelling out thousands on a brand new fishing boat if you just need a simple – but comfortable – alternative. Not to mention… it’s really fun.

    Jon Boat to Bass Boat Project
    The Minimalist Fisherman - Over 2,000 Subscribers Banner
    Click the banner to jump to The Minimalist Fisherman on YouTube.

    You can view the full playlist as it grows and more videos and updates are added.

    Over the next several weeks I’ll be getting caught up on the update videos that I took during the time I was working on the project. These have yet to be turned into videos, because while they were being created I was completely obsessed with growing my business – not fishing or video editing.

    the minimalist fisherman email sign up cover background fire camp river

    You’re Welcome in our Camp

    Add your email below and we’ll keep you up to date on new articles, videos & events. Join us as we continue to work on becoming better anglers – and better men.

    TMF Small White Logo

    As we discussed in the very first video that was created for The Minimalist Fisherman, I’m still very plugged into my business – but – I’ve also made many modifications to my behaviors, so that fishing and video editing (along with healthier eating, working out and minimizing) are all playing a much larger role in my life.

    They can play a much larger role in your life as well.

    All you need to do is simplify and make a one change at a time. Progress. Progress leads to happiness.

    We’ll talk more about that as we go, but for now here are a few before & after photos of the jon boat project. Feel free to hit me up by dropping a comment if you have any questions.

    Jon Boat Project Delivery
    Jon Boat – Delivery
    Jon Boat Seat Removal
    Aluminum Jon Boat – Seat Removal
    Jon Boat Fixed Back End
    Jon Boat Fixed Back End
    Current Jon Boat Status - Holding Up Well!
    Current Jon Boat Status – Holding Up Well!

    Tight Lines & Godspeed, Patriots!

    Callout Section The Minimalist Fisherman Midwest Bass Fishing Blue Banner Background Migration
    The Minimalist Fisherman Father Son Bonding Better Anglers Better Men

    Thank You For Your Support

    Your support directly funds the creation of weekly articles and videos that promote the development of better anglers and better men. Our country (and our kids) need both. Please share this site, and consider a monthly, weekly, or one-time donation. You are helping us make a difference!

    TMF Small White Logo
  • Restoring the Old Jon Boat: Part 2 – Using Aluminum Rivets

    Restoring the Old Jon Boat: Part 2 – Using Aluminum Rivets

    After I washed out the ‘ol boat in the front yard, which we discussed in Restoring the Old Jon Boat: Part 1 – Summary, I immediately started ripping out the seats so that I could have more of a shell. More of an open canvas.

    Jon Boat Seat Removal
    Jon Boat Seat Removal

    There are all sorts of arguments online for the case against ripping out the foam in aluminum boats like this, primarily because it will help you float better… however – I’m not buying it. At least not at face value.

    Removing Jon Boat Seat Foam
    Removing Jon Boat Seat Foam

    Think about it – if you placed a foam cooler inside the boat with you, would it help the boat float? Of course not. Will that foam minnow bucket from Wal-Mart full of water and bait aid in flotation? Nope! Just the opposite, it adds weight to that boat, doing more to weigh it down than lift it up.

    Some people will actually use household spray can foam on the inside of their boat when they need to add more for whatever reason – DO NOT DO THIS!!!!! When we started to work on the Tuffy Restoration Project, I actually found this crap inside the boat – and it was completely waterlogged. (Apologies, I do not have pictures of this but I think you can see some of it in the Tuffy project videos I’ve linked.) This crappy foam added WEIGHT – it did not help with FLOTATION.

    (A quick search let me know that the spray foam is not “closed cell”, which means it will take on water, and that the foam used in boats at the factory is “closed cell”, and impenetrable! Well, not impenetrable, but it doesn’t soak up water. We’ll keep this in mind as we continue to work on the Tuffy.)

    Job Boat Seats with Closed Foam Underneath
    Job Boat Seats with Closed Foam Underneath

    Foam can displace water and prevent more from coming in the boat. Foam can add stability. Foam does not “help you float more good” just by being present.

    So when is foam beneficial?

    When you’re taking on water for one, because it means that space within the boat that could be filled with water is already filled with foam. This could prevent you from capsizing completely, and it could also make it somewhat easier to recover an upturned vessel… or keep your boat from sinking to the bottom of the lake.

    Still, after considering this I decided I wanted the space, so the seats (filled with foam) had to go.

    Jon Boat Blank Canvas - Seats Removed
    Jon Boat Blank Canvas – Seats Removed

    This led to the introduction of many holes in the hull… and I didn’t have any idea how to fix them…

    Aluminum Jon Boat Holes to Fill
    Aluminum Jon Boat Holes to Fill

    One thing I learned right away was that there are several different kinds of rivets (sealed, solid and open for example) in several different sizes (quarter inch, half inch…) made from several different kinds of material (aluminum, steel).

    Using Sealed Aluminum Rivets
    The Minimalist Fisherman - Over 2,000 Subscribers Banner
    Click the banner to jump to The Minimalist Fisherman on YouTube.

    If you are repairing an aluminum boat with rivets – make darn sure they are aluminum rivets. When you add water to a situation where you have steel and aluminum, you’ll get galvanic corrosion.

    Make sure to take a few minutes and do a bit of research on this before you get too deep into your jon boat project. There’s a lot of information out there on this subject.

    I also learned another very important lesson:

    When you are working on a boat, do NOT drill holes any larger than you absolutely have to. Repairing holes sucks.

    Jon Boat Holes to Fix
    Jon Boat Holes to Fix

    I had to purchase some washers to expand the reach of my rivets because several of the holes I attempted to plug were just too wide. These washers also needed to be aluminum to avoid corrosion, and I purchased them off of Amazon. They’re easy to find there, but I couldn’t find any in my local hardware stores.

    At first, I purchased standard rivets, and as you can see here, the tube contains a small circular element that causes the rivet to expand when pulled into a rivet gun – but it does not create a water-tight connection.

    Standard Rivet with Open Body
    Standard Rivet with Open Body

    Sealed rivets however, are completely closed off.

    Sealed Rivets for Jon Boat Project
    Sealed Rivets for Jon Boat Project
    Close Up of Sealed Rivets for Jon Boat Repair
    Close Up of Sealed Rivets and a few aluminum washers for Jon Boat Repair

    So sealed aluminum rivets, with aluminum washers, in combination with Marine Sealant Silicone was what I used to plug all of the holes that I had created. Quick note on the latter… don’t try to use old silicone!

    Go ahead and load your rivet up with the silicone, pop it in the hole, apply pressure using the rivet gun and you’re good to test. If you don’t need to use a washer – don’t! I used several on the INSIDE and OUTSIDE of the hull as you can see in these images. If the rivet head was not wide enough to completely cover the hole and stay firmly in place, then I would place a washer on the opposite side of the hull for stability and added coverage. If you can avoid this though, you’ll have fewer points that could fail.

    Aluminum Rivet, Silicone and Washer Combination on Jon Boat Hull
    Aluminum Rivet, Silicone and Washer Combination on Jon Boat Hull

    (You can see an example of this at about 2:45 in the “Jon Boat Modifications: Using Aluminum Rivets” on YouTube.

    One other thing to keep in mind is that rivets come in different sizes, with different sized shanks. The shank is the tubular portion and it gets left behind after the mandrel is spent. Use the shortest shank that you can get away with (I believe most of mine were 1/4″ long, and 3/16″ in diameter), because the longer they are, the more chance you have of snagging one with your clothes or a shoe or a bag. Aluminum is not as strong as steel, and you could break them off if you catch one the right way.

    So nothing to worry about, but do be careful.

    Best of luck with your project. I’ll post another update on the jon boat soon – and in the meantime if this helped you in any way or if you have any questions, hit me up on social media or in the comments and let me know – I’m happy to help!

    Tight Lines & Godspeed, Patriots.

    Callout Section The Minimalist Fisherman Midwest Bass Fishing Blue Banner Background Migration
    The Minimalist Fisherman Father Son Bonding Better Anglers Better Men

    Thank You For Your Support

    Your support directly funds the creation of weekly articles and videos that promote the development of better anglers and better men. Our country (and our kids) need both. Please share this site, and consider a monthly, weekly, or one-time donation. You are helping us make a difference!

    TMF Small White Logo
  • Restoring the Old Jon Boat: Part 1 – Summary

    Restoring the Old Jon Boat: Part 1 – Summary

    I fished all of my young life. It was something that was built into me by my patents, particularly my father. However, because we went on fishing trips every summer (sometimes multiple trips) and had access to a house on a lake in WI (my grandparent’s), as I got older I started to take it all for granted.

    Scott Hauser & AJ Hauser Fishing
    Scott Hauser & AJ Hauser Fishing

    When it was time to head off to college, we stopped going. I didn’t touch a fishing pole for several years, and instead focused on making websites and playing music.

    About 10 years ago, I really started to get the itch again. I started to fish by myself from shore at places like Lake Shabbona, “the pit” in Sheridan and the Fox River & Illinois River… but I quickly realized that not having the option to use a boat was pretty frustrating.

    AJ Hauser Fishing The Pit
    A “pit” bass – notice the extremely light coloring. The bottom here is sand.

    When we were growing up, we never had a “great bass boat”, or a big ‘ol Lund – we had a simple aluminum boat with an outboard, and I can remember when Dad upgraded to a 30 horse Mercury… oh man – we thought we were Evel Knievel and Dale Earnhardt all rolled into one!

    Scott Hauser Sweet Aluminum Boat & Mercury
    Scott Hauser’s sweet aluminum boat & Mercury
    AJ Hauser Fishing Aluminum Boat Jon Boat Project
    Speed demon? Check. Trolling capability? Check. Fancy seats? Triple check.
    AJ Hauser Fishing Boat
    That hat screams fish slayer

    I remember fishing from that boat, and when I rekindled my interest for the sport, I quickly learned how limiting not having my own boat could be… but… I didn’t have any money…

    Scott Hauser Aluminum Boat
    Me and my brothers & Dad

    So began my Jon Boat Project…

    Jon Boat Project - Clamping the Deck
    Jon Boat Project – Clamping the Deck

    (If you watch this summary video, make sure to look at all the crap in the background… this was clearly pre-minimalist fisherman…)

    The Jon Boat Project
    The Minimalist Fisherman - Over 2,000 Subscribers Banner
    Click the banner to jump to The Minimalist Fisherman on YouTube.

    My first thought?

    What if I bought an old crappy boat, and I fixed it up?! Ohhhhh… I think maybe we’ll do that!

    Turns out this original idea was not so original. After doing a few Googlebox searches, I found out that this was a semi-common practice, and there were tons of guys doing it – even selling plans!

    I bought some plans… but… I wasn’t too impressed. So I made my own – check out these killer, super-professional blueprints!

    Jon Boat Project Plans
    Jon Boat Project Plans

    Now don’t get me wrong – I love fishing from shore when that is the plan and when I have good shoreline access. Hell, because of the added simplicity, this helped me get back into pond fishing after obsessing over my business and (briefly) falling away from the sport again.

    Back to Pond Fishing
    The Minimalist Fisherman - Over 2,000 Subscribers Banner
    Click the banner to jump to The Minimalist Fisherman on YouTube.

    But I didn’t like that I could ONLY fish from shore. There was a small lake I found near me that had a few miles of shoreline (not the pond mentioned above), with only about 25 feet that could actually be fished via the shore. Situations like this really lend themselves to a small boat – and even though I have a kayak, I wanted something that was a little more comfortable to fish out of.

    Fishing a Small Lake with No Shoreline Access
    Fishing a small lake with limited shoreline access

    So I hopped on Craig’s List, and I quickly realized that everyone wants just a little too much for their boat. I’m not sure if this is because they have buyer’s remorse, or they don’t quite understand what things are actually worth, but it was pretty frustrating browsing overpriced listings.

    Finally, I found this ‘ol dingy for the low low price of $200, located in a little town called Buda (population 528 at this time) and it was on like Donkey Kong! I went to pick it up without even thinking about how I was going to get it home…

    Jon Boat Project Pick Up
    Jon Boat Project Pick Up

    Fortunately, I had several straps, bungees, and access to back roads so I could get this beast back, drop it off, and begin the process of working on it.

    I remember when I arrived, I literally tossed the boat in the front yard and started spraying it out with a hose, and TONS of bugs and spiders came running and sliding out of it.

    Jon Boat Project Delivery
    Jon Boat Project Delivery

    It was disgusting… but… this was at least a solid starting point.

    Jon Boat Project - Beat Up Bottom
    Jon Boat Project – Beat Up Bottom
    Jon Boat Project - Beat Up Back
    Jon Boat Project – Beat Up Back

    I had the boat.

    I didn’t have a TRAILER… but… I had the boat.

    So then obvious next question was “well… now what? Where do I start? Where do I even begin??” Look at this big green thing on the garage floor… I don’t even know if it floats! I don’t know if I drill a hole in it if I can seal it up!

    So like I already mentioned, I did what we all do and went to the internet! Huzzah! I found some “plans”, but they were all so messy… I bought one of the PDFs I stumbled upon, and I wasn’t real impressed… we can do better.

    We must do better.

    For science.

    This led to some late nights sitting up drawing out what the boat could be… and that is a fun little game to play. If you haven’t done this with a project in a while, I highly recommend it. Let your mind just GO wherever the hell it wants. We could put a livewell in it. We could put some storage compartments in it. We could put a flamethrower in it!!

    Jon Boat Project Plans
    Jon Boat Project Plans

    Well, a lot of these ideas didn’t materialize – but you know what – simplicity won. The boat is minimal (imagine that!) and it is functional and it is awesome. We have fished out of it a lot, and caught some lunkers – and I plan to do much more of that this year.

    Jon Boat Fixed Back End
    Jon Boat Project – Fixed Back End
    AJ Hauser Jon Boat Northern Pike
    Jon Boat Northern Pike

    I have a stockpile of images and videos that I need to go through and post, along with every single receipt for everything I bought for this rig, and it all started with a $200 boat and a $300 trailer.

    Onward, my friends – if you have any questions just let me know, I’ll be happy to answer them.

    AJ Hauser Fishing Boat Project
    A couple of brothers, just fishin’ with Dad

    Tight Lines & Godspeed, Patriots.

    Callout Section The Minimalist Fisherman Midwest Bass Fishing Blue Banner Background Migration
    The Minimalist Fisherman Father Son Bonding Better Anglers Better Men

    Thank You For Your Support

    Your support directly funds the creation of weekly articles and videos that promote the development of better anglers and better men. Our country (and our kids) need both. Please share this site, and consider a monthly, weekly, or one-time donation. You are helping us make a difference!

    TMF Small White Logo